
Hello! You may have found me while doing a search for a Minecraft quilt block or the whole quilt – welcome! On this page I am combining all previous posts with the most basic information to make it easy for you to find what you need and create what you came here for. There are many colors, and many tiny squares, and some blocks are tricker than others – keep asking questions so you can get the finished quilt that you (and your little one) so desire! You may still need to refer to the individual blog posts, so I will link those here as well, but my goal is to get all of the important information on this one page for you.
If you are looking for a PDF download, those have been added to my Facebook Group.

The finished quilt size is 60″ x 71″.
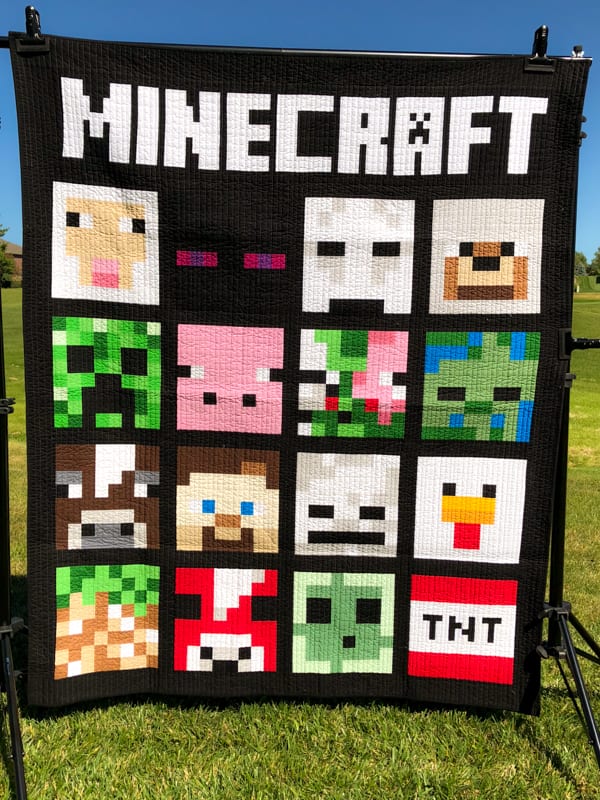
Minecraft Block Pages:
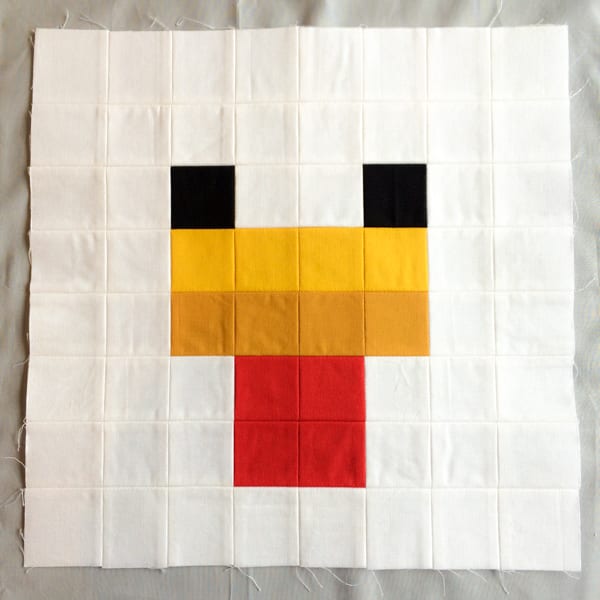
Block 1: Chicken
Block 2: Cow
Block 3: Creeper
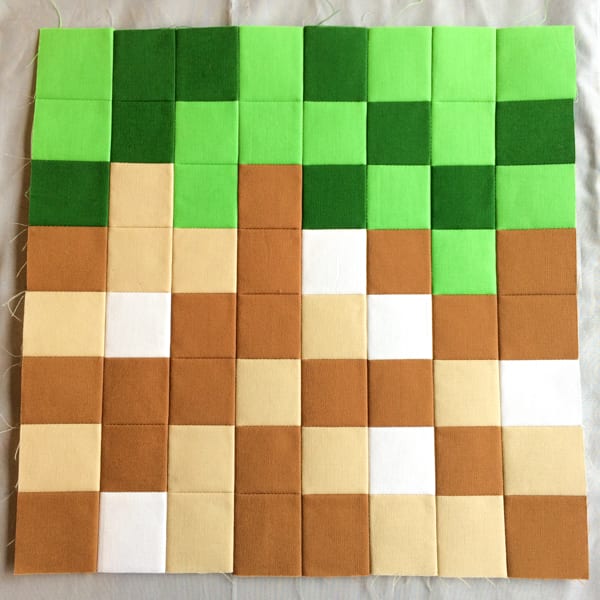
Block 4: Dirt
Block 5: Enderman
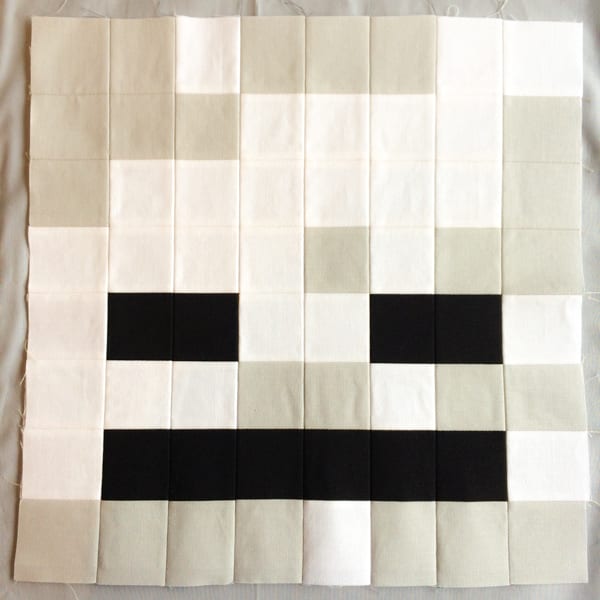
Block 6: Ghast
Block 7: Mooshroom
Block 8: Pig
Block 9: Pig Zombie
Block 10: Sheep
Block 11: Skeleton
Block 12: Slime
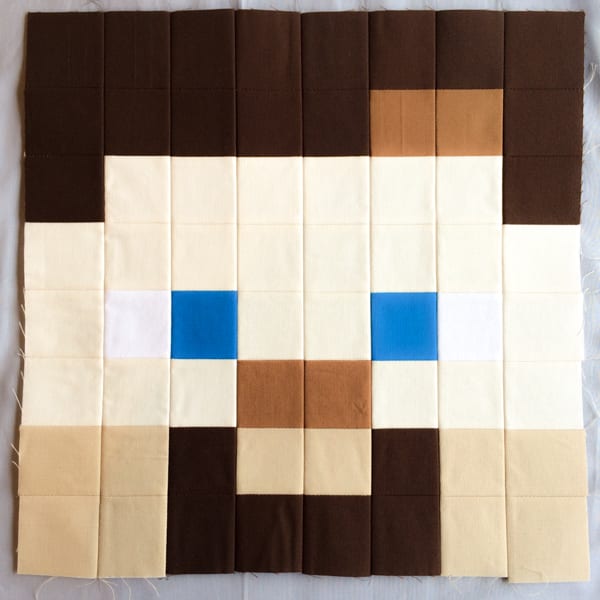
Block 13: Steve
Block 14: TNT
Block 15: Wolf
Block 16: Zombie
Block 17: Title Block
Bonus Block: Ocelot
Borders / Sashing / Finishing
How to use Fusible Grid to Create Minecraft Quilt Blocks:

Kona Solids Fabric:
Kona Black: 1 yard* + 2 yards for Borders, Sashing and Binding
Kona White: 1-1/4 yards
Kona Blush Pink: Scrap 4″ x 8″
Kona Bone: 1/8 yard
Kona Cardinal: 1/4 yard
Kona Carnation: 1/4 yard
Kona Cerise: Scrap piece 2″ x 8″ or 4″ square
Kona Champagne: 1/8 yard
Kona Coffee: 1/4 yard
Kona Earth: 1/8 yard
Kona Grellow: Scrap piece 2″ x 8″ or 4″ square
Kona Jungle: 1/4 yard
Kona Kiwi: 1/8 yard
Kona Laurel: 1/8 yard
Kona Leaf: 1/8 yard
Kona Malibu: 1/8 yard
Kona Mint: 1/8 yard
Kona Mulberry: scrap piece 2″ x 4″
Kona Raffia: 1/8 yard
Kona Shadow: 1/3 yard
Kona Sour Apple: 1/8 yard
Kona Steel: Scrap piece 4″ x 10″
Kona Yarrow: Scrap piece 2″ x 8″ or 4″ square
Optional: 2″ Fusible grid: about 4 yards
For the fusible grid, I found the end of a bolt at my local quilt shop. It is Quilt Fuse 2″ Fusible Grid Style 3240-1 Width 48″.
*This yardage is for the 16 quilt blocks and Title Block.
Kona Black will also be used for sashing, borders and binding. You can get all the sashing, borders and binding from a 2-yard cut. I break down the instructions in the Finishing Instructions below.
All squares will be cut at 2″ or 1-1/4″. I used the 2″ fusible grid for everything, regardless of cut size – I just ignored the lines for the smaller squares.
Minecraft Chicken
Cut all squares 2″
Kona White
Kona Grellow
Kona Yarrow
Kona Cardinal
Kona Black
Minecraft Cow
Cut all squares 2″
Kona Coffee
Kona White
Kona Steel
Kona Shadow
Kona Black

Minecraft Creeper
Cut all squares 2″
Kona Black
Kona Kiwi
Kona Sour Apple
Kona Jungle
Kona Mint

Minecraft Dirt
Cut all squares 2″
Kona Earth
Kona Sour Apple
Kona Raffia
Kona Jungle
Kona White
Minecraft Enderman
Cut all squares 2″
Kona Black
Kona Cerise
Kona Mulberry

Minecraft Ghast
Cut all squares 2″
Kona White
Kona Shadow
Kona Black

Minecraft Mooshroom
Cut all squares 2″
Kona Cardinal
Kona White
Kona Black
Kona Shadow

Minecraft Pig
Cut all squares 2″
Kona Carnation
Kona Black
Kona White

Minecraft Pig Zombie
Cut all squares 2″
Kona Jungle
Kona Carnation
Kona White
Kona Sour Apple
Kona Black
Kona Blush Pink
Kona Shadow
Kona Cardinal

Minecraft Sheep
Cut all squares 2″
Kona White
Kona Champagne
Kona Black
Kona Carnation
Kona Blush Pink

Minecraft Skeleton
Cut all squares 2″
Kona White
Kona Shadow
Kona Black
Minecraft Slime
Cut all squares 2″
Kona Leaf
Kona Mint
Kona Black

Minecraft Steve
Cut all squares 2″
Kona Bone
Kona Coffee
Kona Raffia
Kona Earth
Kona Malibu
Kona White
Minecraft TNT
Cut all Cardinal squares 2″
Cut 20 White squares 2″
Cut all Black squares 1-1/4″
Cut 26 White squares 1-1/4″

Minecraft Wolf
Cut all squares 2″
Kona Shadow
Kona Earth
Kona Raffia
Kona Black
Kona Coffee
Kona White

Minecraft Zombie
Cut all squares 2″
Kona Laurel
Kona Jungle
Kona Malibu
Kona Black

Minecraft Ocelot
Cut all squares 2″
Kona Banana
Kona Yarrow
Kona Raffia
Kona Jungle
Kona Coffee
Kona Espresso
Kona White

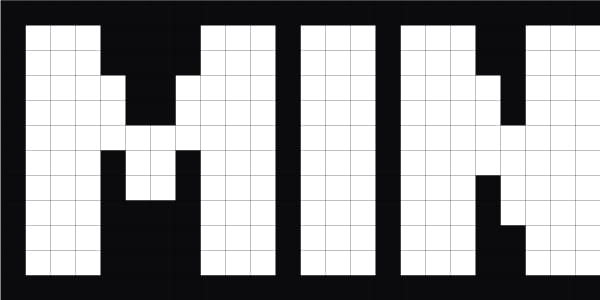
Minecraft Title Block
Cut all squares 1-1/4″
Kona Black
Kona White
I strongly suggest that you use fusible grid even if you haven’t used it for the other blocks. With the squares starting at 1-1/4″ and finishing at 3/4″ it will help to keep everything in place and stable as you piece it together. I broke it into 3 sections and I still had to stretch it into place as I sewed each line. To break it evenly, divide it along these sections:
Leading black vertical line + MIN
Leading black vertical line + ECR
Leading black vertical line + AFT + final black vertical line
And again – I used the same fusible grid used in the 2″ character blocks above, but I ignored the lines and just folded over for the natural line.


Borders & Sashing
This is what the borders and sashing will look like. See the following section on cutting the 2 yards of Kona Black for Borders, Sashing and Binding.


From the 2-yard length cut the following:
4 Binding strips 2-1/2″ x 72″
2 Border strips 3-1/2″ x 65-1/2″
2 Border strips 3-1/2″ x 60-1/2″
4 Sashing strips 2-1/2″ x 54-1/2″
12 Sashing strips 2-1/2″ x 12-1/2″
See how I placed the cuts in this image:

Use the table above for placement around the blocks.
Quilt as desired and Bind. Gift to Little One (or Big One). Enjoy your creation! And find me on Instagram and share your finish @myrainydaydesigns #MinecraftQAL


I love this and and am going to be making this for my 6 year old grandson – thank you
This pattern is so great, thankyou, easy to follow detailed instructions and comes out amazing, I’m not finished yet and added a few other panels to create a bigger quilt top, but I love it already. My son is so happy. Now to start thinking about the next one for my daughter
Hi there, I’m having the same problem that Rebecca did with the TNT block. Are you sure the smaller cut squares are not supposed to be cut at 1 in rather than one and a quarter? I’ve tried a hundred different ways to get them to fit at 1 and 1/4, and I just can’t figure it out.
Out of curiosity, I tried a sample block with 1 inch squares instead of the one and a quarter, and I was able to make it work there. Am I doing something wrong?
Hi Ian,
Yes, I had cut the center letter TNT squares to 1 1/4″ and then the sides and top and bottom squares to 2″. I sewed together the TNT letter squares first, and then added the side squares (2 white to the left and 2 white to the right) and then add the 2 rows of red and one row of white (2″) to the top, and same again for the bottom.
Hi Ian – I am the Rebecca of the help post. I did end up making it work but could only do so by sewing together the 11/4 inch blocks not using the gridded interfacing. I then placed it into the centre of my interfacing and set out the 2inch blocks around it, pressed it and then stitched as normal.
My grandson wants a minecraft (which is foreign territory for me) quilt. So glad I found this! Now, here I go!.
YAY!!! Good luck Sylvia – you got this!
My high school graduate grandson requested a Minecraft quilt for his graduation quilt so I’m so glad I found your instructions. I second using fusible grid; I made some blocks without it while I waited for my order from Amazon since I couldn’t find any in my fabric shops and when I received my order I started using it. Wow! What a difference! Not only is it easier but the blocks look nicer.
Now that I’m ready to quilt it I have a few questions:
1) did you quilt it
2) with the various block colors what color thread was used on the top stitching?
Thank you for sharing all your figuring of how to make this very awesome quilt.
Jerri G
Hi Jerri,
I sent it out to someone that has a longarm machine – she set channels for even lines and used a light grey thread.
The things we do for kids! For my granddaughter I would choose six symbols and make the squares bigger. Life is too short.
I like the idea of choosing a few Designs and bigger squares! Too old to do so much!
I am so glad I found this. I have a 7 year old grandson who wants Minecraft and I had no idea how to do it. This is will a lot of help. I am considering using bigger squares also.
Started today! Cut all the squares, and my 10-year-old daughters placed out five blocks.
Minecraft seems to be timeless. Even my 15 year old still likes it. Are you by any chance still creating block designs for the new characters such as AXOLOTLS ?
Tricia, this is mind boggling! My 6’4″ grandson wants a Minecraft quilt….he hasn’t asked for anything since……. well, it feels like forever. He’s the last the grandkids, but now I’m almost 80 and wondering if this is too daunting. Do you sell this pattern in a printed form? I would be glad to pay for it, or even, to print it myself. What a LOT of work! I will do the fusible base, as that makes total sense to me, and am lucky to have about 20 years worth of Kona scraps from which to choose! thank you so much, I look forward to hearing from you.
Hi I am just going to start making this and I was wondering if you used a 1/4 inch seam or 1/2. I am so excited to do this. Thank You
All seams should be 1/4 inch. Have fun!!
I know this is an old post, but I have everything crossed you might be able to help.
I’m plugging away at this for my son (and it’s my first foray into quilting so I am well out of my depth). I’ve managed every block easily so far but now I’m at the TNT block and cannot make it work. I’ve quadruple checked my measurements but cannot get the letters to fit. I did end up getting g 2” gridded interfacing. Could this be the issue? I’m trying to get it sorted before I move onto the title block because otherwise it’s going to be so tricky! Thanks so much for your help.
Hi Rebecca! Note that the center squares of the TNT are smaller than the outer edges. So do the center TNT squares first at 1 1/4″ and then the outer squares at 2″. The center section is 12 across x 4 high. And then three 2″ rows above and three 2″ rows below, and one 2″ on either side. I did use the 2″ grid for this section as well, but ignored the grid lines. Same for the Title Block if you are doing that.
My grandson wants a quilt made of only the wolf block in the middle. Any ideas?
Since the squares are equal sizes, you can increase the size of the squares in the wolf to the finished size, add a border if you need it larger.
I assume the 2″ grid is an interfacing which is a synthetic material. I was wondering if this affected the how the quilt looks after being washed since the quilt is made out of cotton and will shrink after it is washed and dried but the grid won’t.
It will shrink a little, but I didn’t notice anything extraordinary after washing. The second photo at the top of the page with the quilt frame and grass is after a few washes.