Hello there! It’s June, and I haven’t posted in awhile. I apologize for that if you were looking for some updates. Life is just so crazy – all the time – and I need to do better!
Do you embroider – anything – ever? Do you use software, or are you thinking of using software? This is NOT a sponsored post! Not trying to sell you anything, just trying to share some knowledge.
I bought my sewing machine about 10-11 years ago. It had an embroidery component, but I had never embroidered anything before. Wasn’t sure it would be something I would use – I just wanted to sew fabric together. So I tried one day, and then something else, and then I kept going.
After a few months I started looking into software; I was looking at Mac specific software, as I am a Mac. I am NOT a PC unless forced to be a PC. So the same store where I bought my machine, they had software, Mac compatible. I know Embrilliance seems to be a popular choice, and I haven’t tried it so I don’t know much about it – but I do know my software of choice, there isn’t much out there for information on tips and tricks, how to use certain features, etc.
When I was initially looking at software (10-ish years ago), it was very expensive to buy the box, and I think it was called TruEmbroidery, something like that. Then it changed to various levels of Premier, Premier+, Premier+2. About 3 years ago, I dove in and bought the software. I was clueless. I can usually figure out software without too much trouble, but not having any background in this software, or the type of software, I was a little lost. Yes there was a very long PDF download for an owner’s manual. Yes, I found this one website that was supposed to be helpful, but watching the videos, it was like you were a 100-year old person that had never seen a computer before and was painful to get through.
I found another website that told you how to click buttons – I figured that part out already – but not why you were clicking, where to click, what this accomplished, why do you click like this and not like that… I was so frustrated, and those around me that knew I had software couldn’t figure out why I couldn’t just take this super detailed artwork and “click” make a patch for someone – after all there is an auto digitizing function, LOL. After a long time of being frustrated and not finding resources, I went to my old stand-by: Break It and then Fix It. Then you’ll figure it out.
Very slowly, that is working for me. I’ve learned how to do several things – my favorite being import fonts (already digitized embroidery font letters) and not have jump stitches! And Combine and Align. A new favorite.
Let me know if there is any interest in some screen-shot tutorials of some basic things. I use MySewNet – there is a steep learning curve and I haven’t even tried everything yet, but I like it. Again not a sponsored post. The software is available for Mac and PC – there are more modules available on the PC so I have to use those on my Surface, but I do all the font work, combine and align, and more on my Mac.
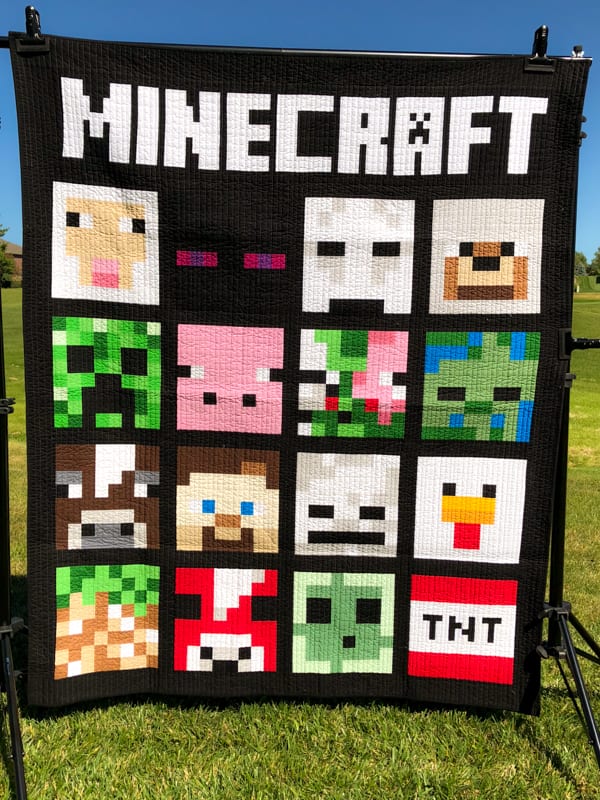
I made these cuties with the software – they all have names.
There has been some confusion lately as to where you can find the PDF files. I have moved all of the PDF files to my Facebook Group, but you can still find the projects and photos on the site here, such as the Crafty Pixel Quilt that has been so popular over the last 7 years! All of the information is still on the page with photos.
And the Floriani – Madeira conversion PDF. Yes, all the Madeira colors in the PDF were available at the time of conversion – most if not all are still available on their website. This is a reference and should be used as a guide – a starting point. Use your thread stash, project, lighting, etc. to make your final thread selections.
I have plans to add more resources to the Group in the future – just need to figure out some free time to do so. Until then, thanks for stopping by and I hope you enjoy creating your Rainy Day projects!
I just finished something I have been working on for a while now – my Floriani to Madeira thread conversion chart. I have several designs that call for Floriani thread, which I don’t have. I use Madeira Classic Rayon #40 and a few of their other lines. I have all 7 boxes of the Classic Rayon #40, plus one box of the PolyNeon #40 – meaning I used as great a range as possible with Madeira for the best conversions.
When working on designs with up to 40 different thread colors, such as a State design, it took a long time to try and convert the called for Floriani thread color, match it up to the Floriani Color Card that I have, and convert that to Madeira – each time. One reason why I have only finished 5 states so far!
So I decided to start from scratch, go column by column for the Floriani Thread Chart, and convert it to Madeira the best I could. This is not a decisive list, more of a suggested starting point. You will notice that some of the Madeira thread colors are duplicated because I couldn’t get a different Madeira thread color for each different Floriani thread color. And as I have with the States, this is a starting point and the final Madeira colors used will likely change when you pull all the colors and see how they work together.
Not all are a perfect match, but I matched as close as I could. I kept searching for a good Floriani to Madeira thread color chart but couldn’t find one! My Floriani Thread Chart isn’t labeled with a version or a date, but has 24 columns of solid colors. I did not attempt to convert the variegated or metallic colors – just the solid color columns.
I hope this is useful to someone – as I kept searching for this and couldn’t find a helpful tool, I thought I would share my conversion chart as it could be helpful to someone else.
The file has been moved to my Facebook group. Messages for how to download the file without a thank you after I give a link make me wonder why I share. Requests for the password so they can change my work make me think they want to profit off my work. And at the time this was created (2019) all colors in the list were either on the card (Floriani) or in my hand (Madeira). I can’t control what either company changes – was just doing a color match.
You may have noticed I have been doing a lot of machine embroidery lately, and I wanted to share a few of the tools that I use all the time – a few of my favorite things. My absolute favorite tool is the brother Multipurpose Screwdriver – it has three functions and I always use two of them during the machine embroidery process. I use placement 1 when changing the sewing machine foot and needle. And I use placement 3 to loosen and tighten the machine embroidery hoops. Placement 2 I have used when I needed to loosen the lower plate, where the bobbin sites, but I don’t do that very often. This tool is so handy, it should come with the machine, or at least the embroidery part of the machine! There is not a good way to get the embroidery hoops to tighten by hand, as well as you can with this tool that sits over the angled screen and perfectly sits in the groove to tighten as needed. And I love how it can easily switch to different placements. You won’t regret having this – a perfect gift for yourself or a friend! I have the Brother model (SAMDRIVER1) but there are generic versions as well.
Another tool I found to greatly help with my machine embroidery is the Hoop Grip Tape. I was having a problem with some of the thinner fabrics and/or stabilizers slipping and not staying taut when tightening, so I decided to try this gripper tape. I love it! While it’s not perfect and some fabrics are still slippery, it is a lot more stable. And the beautiful thing is it’s a once and done product – put the tape on the outer rim of the inside hoop and that’s it – it will stay on and do its magic until you remove the tape band. What you see below with the yellow – the yellow actually peels off, as well as an inside tape cover, and it’s a two-sided product. The sticky tape sticks to the inside hoop (outer edge where it aligns with the outside hoop), and the non-sticky side is covered in suction-like grippers that hold the fabric in place, but release when you are done and don’t leave any residue or bumps or any kind of damage. It’s a good temporary gripper for the fabric as you embroider, and it stays on the hoop forever!
And finally for this post, I love my Tula Pink Hardware collection. I have all the Tula Pink hardware pieces except for one pair of snips, but my favorite has to be the EZ Snip scissors – I had a different pair that I used for embroidery, to snip the embroidery thread while it was stitching but those kept getting bent and off track. This pair I have had for a while and so far so good. It’s a great tool how it is curved and can easily fit under the machine raised foot to snip the loose thread, and then keep the machine moving. Check out the rest of her collection too – you won’t regret it!