Clearly I’m lacking in my socials – blog posts, facebook posts, instagram posts, progress reports…
Oh I have big plans, and I do a lot of “behind the scenes” activities each day, but most of the time I’m too focused on what I’m working on, and life, to post about it.
I can’t promise I will post often. I can’t promise I will deliver on whatever is requested of me.
I have many more product designs planned this year – so many more Kitchen and Bath towel designs, Tin designs, Finger puppets. And more, like Mug Rugs, mini quilts, bags, stuffies, accessories. Big plans.
So, hopefully I’ll be back soonish with some more updates.
Giddy up, it’s Tuesday! This week’s tin set feature is Cowboys. Includes cowboys, a sheriff, a bank robber, some horses, a bull, the Sheriff Station, a wagon, a cactus, some pistols, a wanted poster, and 2 removable backgrounds.
Remember, my tin sets are not just for kids – adults also fidget with them, decorate their desk at home or work, glue magnets on the back for refrigerator magnets or storyboarding, popsicle sticks for plant markers, glue on to badge reels. The possibilities are endless. I just provide the cute.
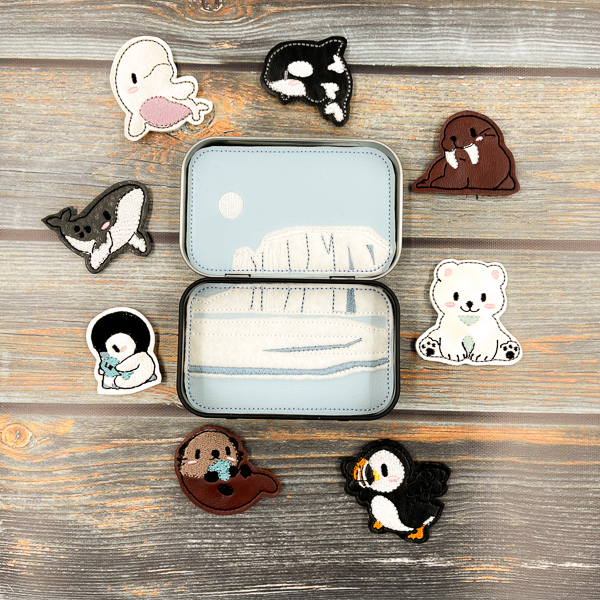
Hello and Happy Tuesday! This week’s tin set feature is Arctic Animals. This set is so adorable, I think my favorite has to be the little penguin.
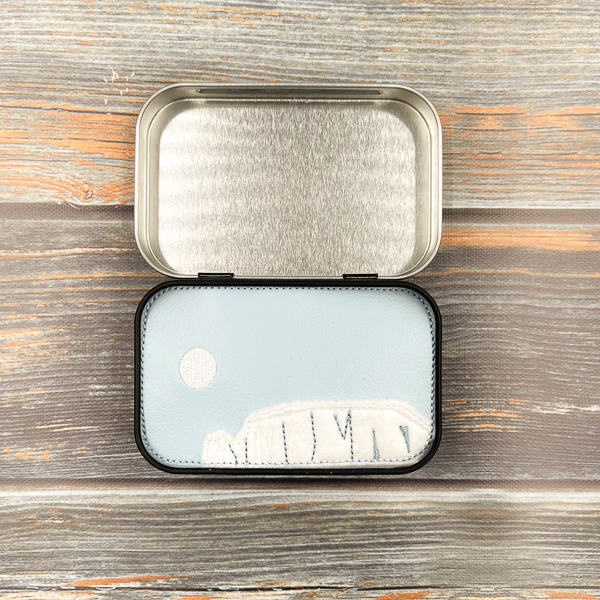
The Arctic Animals set includes 8 animals: Beluga, Humpback Whale, Orca, Otter, Penguin, Polar Bear, Puffin and Walrus. It also includes 2 removable backgrounds, and a tin that stores everything for travel.
Remember, my tin sets are not just for kids – adults also fidget with them, decorate their desk at home or work, glue magnets on the back for refrigerator magnets or storyboarding, popsicle sticks for plant markers, glue on to badge reels. The possibilities are endless. I just provide the cute.
Find The Arctic Animals Tin Set in the Studio or on Etsy.
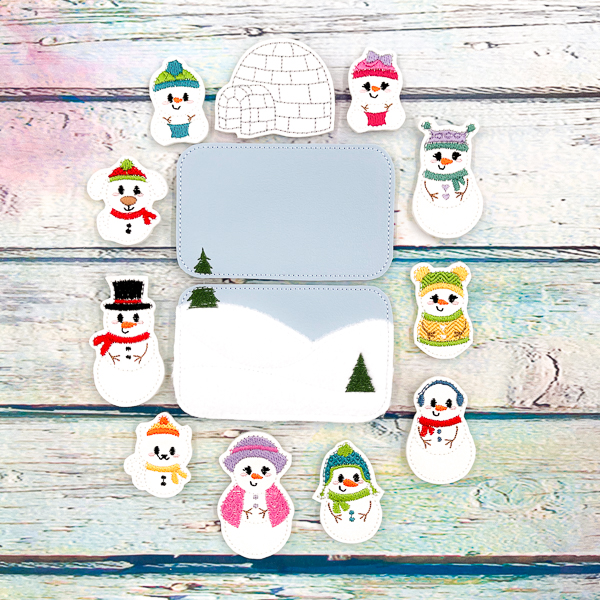
Hello and Happy New Year! I know it has been awhile since I’ve posted – so much happened last year, still trying to process it all. But here we are in January! It’s a new start, it’s a new year. There’s just something about January. And that brings me to our first Tin Set Tuesday feature: The Snowman Family.
The Snowman Family tin set features 10 snowman family members plus an igloo, 2 removable backgrounds, and a tin that stores them all. Embroidered on a shimmery white vinyl, backed with felt and hand cut, the bright colors and soft textures will entertain fidgeters of all ages.
Remember, my tin sets are not just for kids – adults also fidget with them, decorate their desk at home or work, glue magnets on the back for refrigerator magnets or storyboarding, popsicle sticks for plant markers, glue on to badge reels. The possibilities are endless. I just provide the cute.
The largest feltie in this set is the Dad at about 1″ wide x 2″ high. The snow babies and snow pets are about 1″ wide x 1 1/2″ high. The tin itself is about 4″ x 2 1/2″, perfect to toss in your bag and take wherever you go!
Find The Snowman Family Tin Set in the Studio or on Etsy.
Did you know that my journals come with replaceable inserts? I currently have the 60-page lined journals that come with each cover, and when you use that up, you can pop in a new journal and keep going with the same cover you love!
Some current journals below. More coming soon!
Also I’m on the new Threads app. Are you? Find me @myrainydaydesigns, and linked from my Instagram. Follow me for updates, fun memes, and the occasional unraveling.
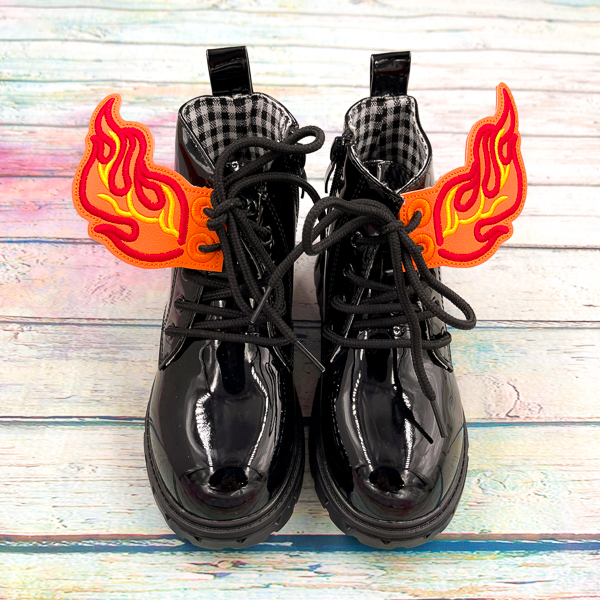
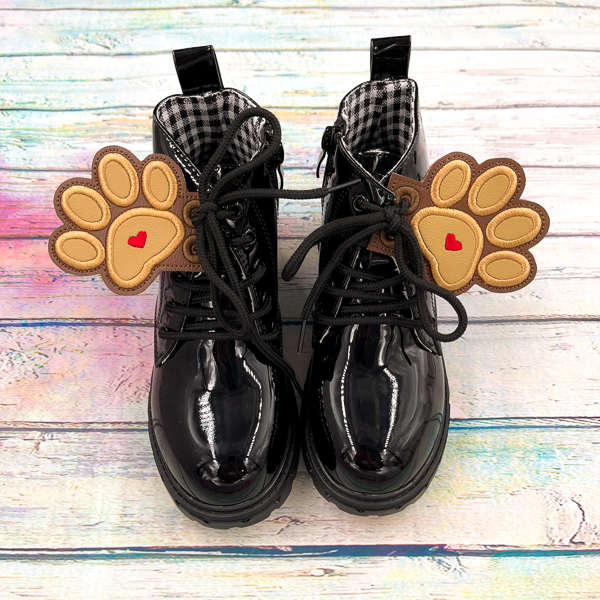
Shoe Wings are here! I had made a couple of pairs and they turned out great, but I didn’t have any boots to show them in photos – but now I have boots, and I made many more wing sets this weekend, and more are coming soon!
Photos below of the wings currently available – tell me your favorite that you see here, or what you would like to see in the future! See all Shoe Wings here. Happy Monday. Happy May Day!
I made some new finger puppet sets – super cute and perfect for Valentine’s Day! Or the Lucky Bucket for St. Patrick’s Day, or the Easter basket… really just great year-round!
You can get a single set, or all 8 in the collection! Find them all here: Finger Puppets.
Hello 2023! I am working on plans for this year – what I want to accomplish, new projects, redirections. What works, what isn’t working – all the new things. But first, I am taking a short break, for an epic adventure. I will share more on that later.
My Etsy store will be in vacation mode until mid-January; that is also when I will start making new things from my list and prepping for spring shows. If you have any requests, leave a comment!
That is all for now – see you in a couple of weeks!
Did you know that I could make costumes? Neither did I!
This weekend, in Columbus, Ohio, there is a convention called Power-Con. Honestly, I had never heard of it until last year, when it was in Anaheim, and I got a Disney trip out of it while my boys had a convention day. My son had so much fun last year meeting animators and toy designers and more – mostly related to Masters of the Universe, and there was a costume contest.
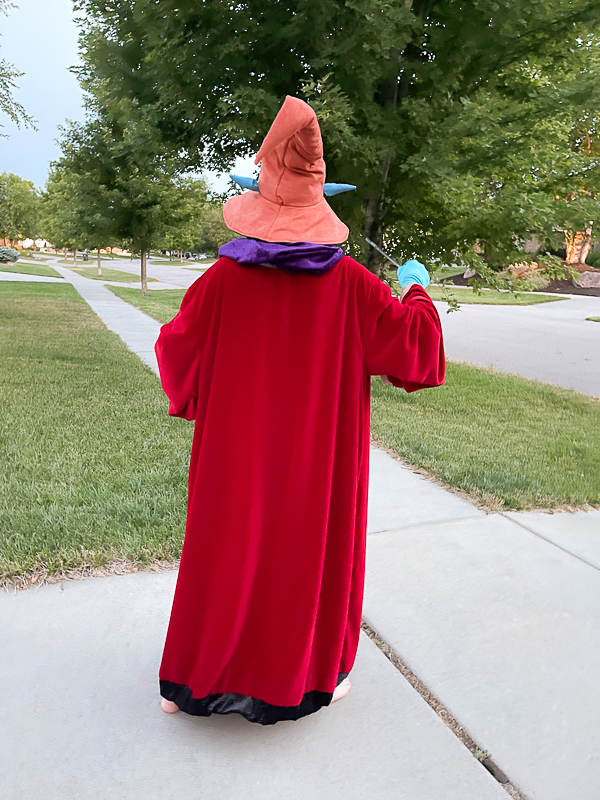
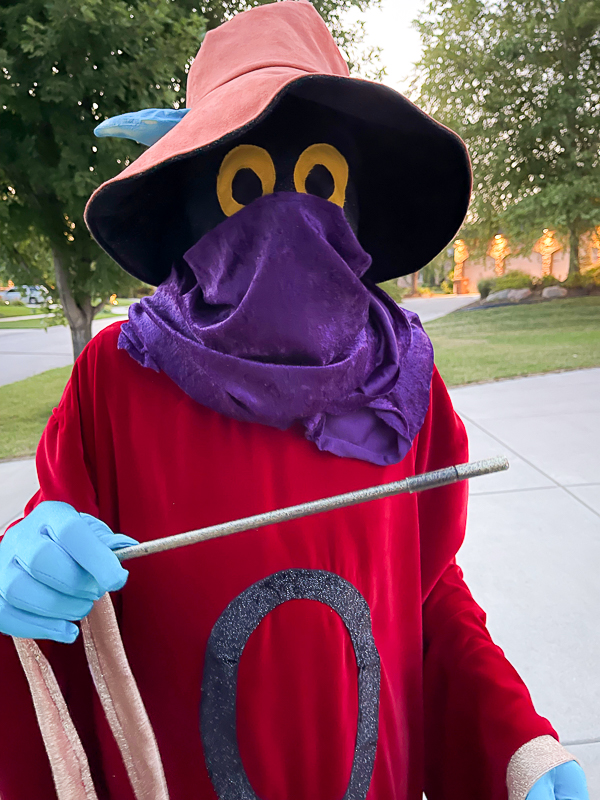
This year, not solely focused on Masters of the Universe, but more a general toy convention, he still wanted to enter the Cosplay Contest – and he wanted to be Orko. As the self-proclaimed “Orko’s Biggest Fan”, I would have a hard time getting him to select something else, like – I don’t even know – something easy.
He had this vision in his head with a mash-up of different Orko designs he has seen. We went to Joann to select fabric – we ended up with red velvet, stretchy sparkly glitter, gold mesh, purple crushed velvet – some of the most difficult fabrics to work with. I have a decent sewing machine – it’s great for flat things like quilts. It is NOT an industrial sewing machine so it was pretty frustrating to put some of this together.
I made the robe first – I thought that might be the most difficult, and it would also be the majority of the look. I used a Harry Potter Wizard Robe pattern and modified it as needed. I think the robe could have been a little longer, but the velvet we found was not very wide so I had to improvise at the base – I added some more sparkly black to hide the wire in, helps to give it some volume, and help to see him as floating.
The purple scarf was next – we went back and forth with a long scarf to wrap around, or cut it short and add velcro to the back – we decided on a long scarf, and attach it to the nose.
The face cover was tricky in that you’re not supposed to see his eyes, but he still needed to see! Initially he was going to enter on a hoverboard, but that was scrapped at the last minute due to the limitations of the room. I had to double up some black mesh so he could see, but you couldn’t see his eyes, and then add to the yellow eyes, and then add to the stretchy face cover, that could tuck in under the hat, scarf and robe – with a scarf attached to the nose.
And finally, the hat. My husband found this perfect hat on Etsy, placed the order, left a note asking about rushing shipping to have it in time, she said it would be delivered in time, we waited. It never shipped. He contacted her – she said “Oh I thought you meant October, not August.” So I had to make a hat.
Making the hat was not fun – I found a basic hat design I could use, downloaded, turns out it was all in cm, but did have US Letter printing options. I printed that, followed the instructions – it didn’t fit! I mean it’s sewing in circles so things get off, I thought I had done something wrong. We backtracked and double checked – the initial pattern, even if everything was perfect, still would not have fit. So we made some modifications, and made it fit. The tricky part about the hat is the ears. We found some latex ears, painted them blue, and then sewed them in to keep them in place. Because of course he has to have ears sticking out of his hat. I was not a fan of making the hat, but I think it turned out pretty good – and it fit!
Going into this – first costume made – I didn’t actually think we’d win. Hopeful! But didn’t feel it. I did want him to have fun and kind of feel like Orko in it. They said they received a lot of compliments – from the general public, other cosplayers, and the judges, and a lot of people wanted a photo with Orko, so I think he had fun with that!
They called me after the contest – and we didn’t win. I guess the winner was transformative – it wasn’t a Transformer costume, but something like that where it came off in pieces and turned to something else? 3D printed I think. But we did get and Honorable Mention – one of the judges talked to them afterwards, and she said she really liked the fabrics we used, and how we tried to bring Orko to life.
Do I see more costumes in my future? I don’t know. I do need to focus on some Cosplay Disney Running Skirts though, I need to figure out my base shape and build on the design from there. Luckily those don’t have hats!
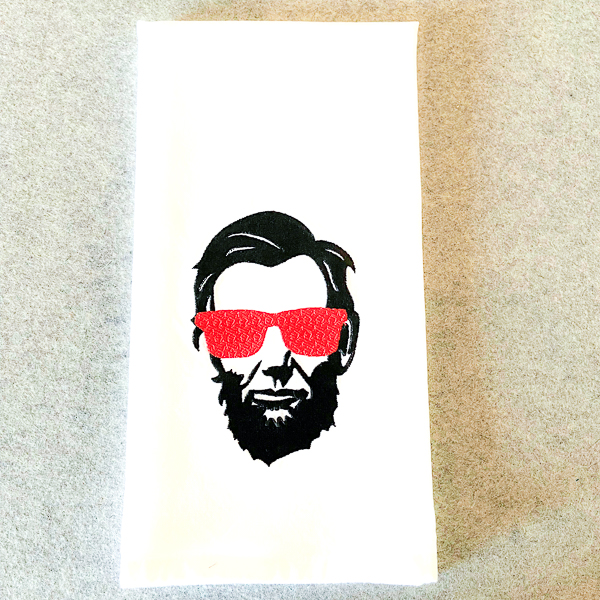
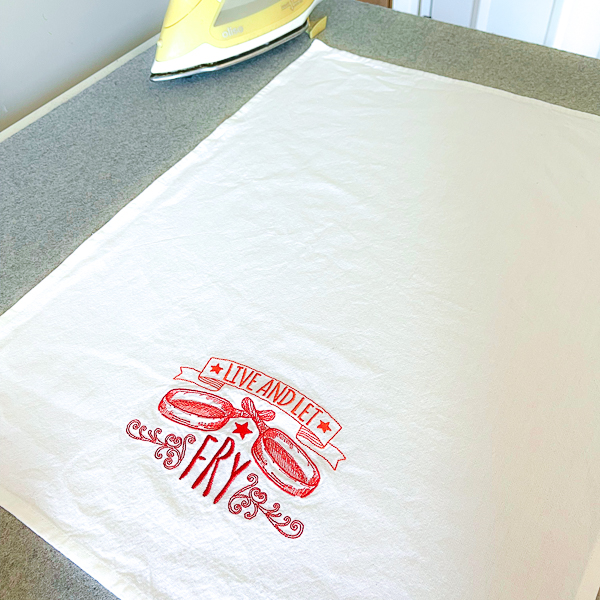
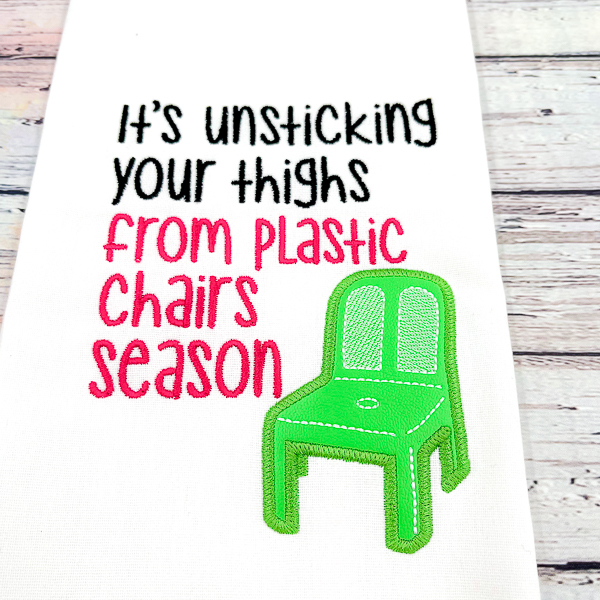
I have been doing several new designs on Kitchen Towels lately, some with big, dense designs, others with a lot of text. Some also have appliqué designs with Vinyl or Fleece. Sometimes I wash them to get the back of the wash-away off, and see how they come out of the dryer. They aren’t always so fun when you first see them out of the dryer – but don’t fret!
For my kitchen towels, I primarily use a towel that is 100% cotton – though I have been trying new versions for more variety in texture and color. But this post is about the 100% cotton towels.
I have photos of two examples below – one with a very dense Lincoln face, the other with a fun, less dense but still scrunched up Live and Let Fry. And as you’ll see, in the end, good as new.
They look a little scary coming out of the dryer. Most of the time I just do a quick iron to the front of the towel, straighten out the edges and the corners, and we’re good to go.
In these instances (as shown below), I start by ironing the design on the back of the towel – iron set to cotton with steam on.
Iron the design portion on the back, maybe a little more if you want, but I stay in the middle of the towel so I don’t iron the hems on the back. Then, I flip it over, iron the front, the edges, the corners, and we’re good!
REMEMBER: If the design has vinyl on the front, like the green lawn chair below – DO NOT iron the vinyl on the front. You can iron the back of the design, just keep the iron moving so it doesn’t melt the vinyl. Sometimes I also use fleece, such as the clouds below – I would probably still iron the back of the design on this one, but I’m less concerned about the iron melting the fleece.
Iron the back first, Cotton setting with Steam.Iron the Front.Iron the back first, Cotton setting with Steam.Chair with Vinyl Appliqué – do not iron the chair on the front!Fleece Clouds